https://github.com/niharpgithub/AnisblePlayBooks
DevOps Tools
Name
Type
Software Download URL
Vendor
Earlier Versions
Version
AzureDevOps (formerly VSTS (Visual Studio Team Services))
Platform as A Service
AzureDevOps
 TeachBharat, Hinjewadi, Pune, +91-9588689939.
TeachBharat - Consultant, Training, Development Center.
Copyrights by TeachBharat , +91-9588689939, teachnewbharat@gmail.com - TeachBharat
Running applications on individual systems cause resource wastage. Virtualization provides a solution to this issue. In fact, virtualization is the process of creating a virtual version of a server, operating system, network or a storage device. It also divides resources between multiple execution environments. Moreover, a hypervisor is related to virtualization. It is a Virtual Machine Monitor (VMM). In other words, it creates and runs virtual machines. There are two types of hypervisors as Type 1 and Type 2.
1. What is Type 1 Hypervisor
– Definition, Functionality
2. What is Type 2 Hypervisor
– Definition, Functionality
3. Difference Between Type 1 and Type 2 Hypervisor
– Comparison of Key Differences
Bare Metal Hypervisor, Host OS Hypervisor, Native Hypervisor, Type 1 Hypervisor, Type 2 Hypervisor, Virtual Machine, Virtualization

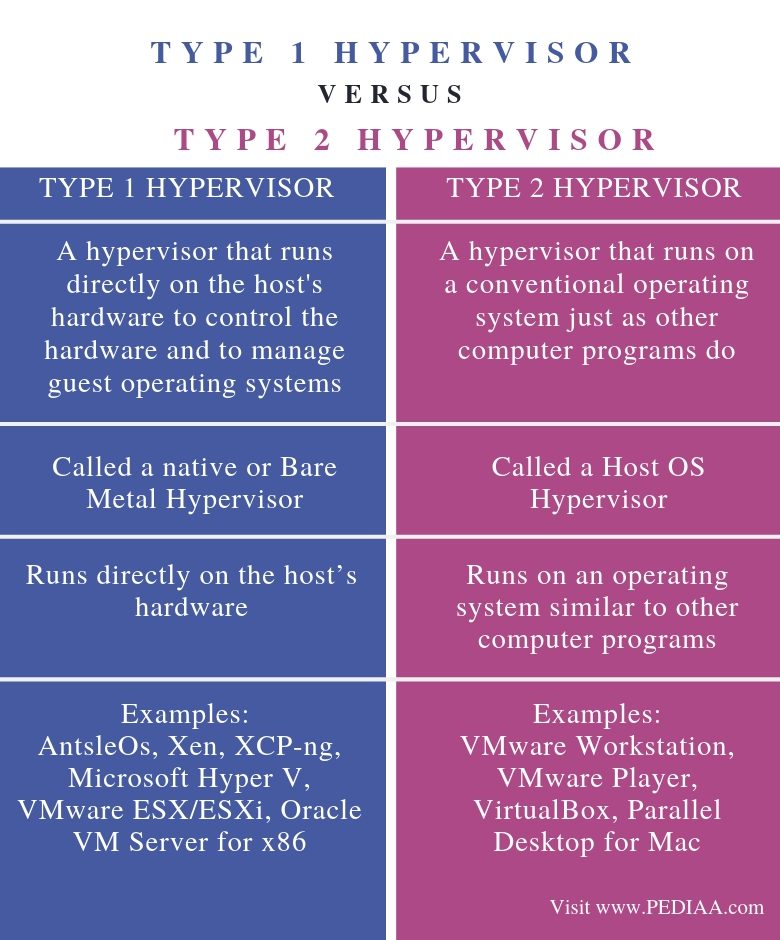
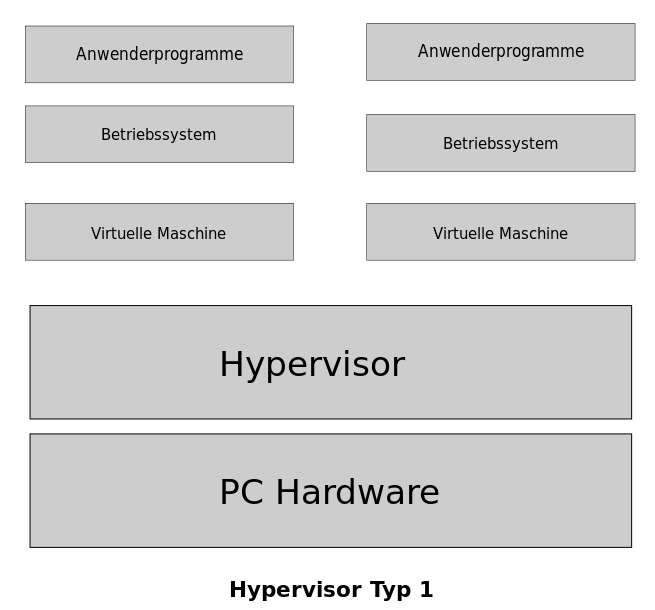
A computer on which the hypervisor runs single or multiple virtual machines is called a host machine. In addition, each virtual machine is a guest machine. Type 1 Hypervisor is called a Bare Metal Hypervisor or native Hypervisor. It runs directly on the host hardware. Furthermore, it manages the guest operating systems and controls hardware.

Moreover, the first hypervisors developed by IBM were native hypervisors. These included SIMMON test software. Furthermore, it also had CP/CMS operating system. AntsleOs, Xen, XCP-ng, Microsoft Hyper V, VMware ESX/ESXi, Oracle VM Server for x86 are some examples for Type 1 Hypervisors.
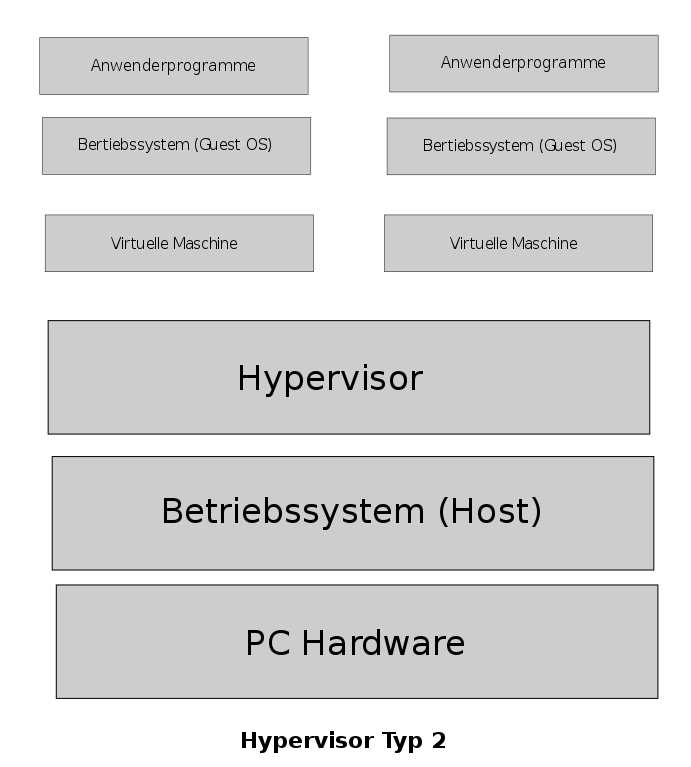
Type 2 Hypervisor is called a Host OS Hypervisor. These hypervisors execute on an operating system similar to other computer programs. For example, assume that there is an operating system. There is a hypervisor on top of the OS. It provides an emulator environment to run another operating system. In other words, a guest operating system runs as a process on the host. Moreover, VMware Workstation, VMware Player, VirtualBox, Parallel Desktop for Mac are some examples for Type 2 Hypervisors.

Type 1 hypervisor is a hypervisor that runs directly on the host’s hardware to control the hardware and to manage guest operating systems while Type 2 hypervisors run on a conventional operating system just as other computer programs do. Thus, this is the main difference between Type 1 and Type 2 Hypervisor.
Type 1 Hypervisor is called a native or Bare Metal Hypervisor while type 2 Hypervisor is called a Host OS Hypervisor.
Functionality is another difference between Type 1 and Type 2 Hypervisor. Type 1 Hypervisor runs directly on the host’s hardware while Type 2 Hypervisor runs on an operating system similar to other computer programs.
AntsleOs, Xen, XCP-ng, Microsoft Hyper V, VMware ESX/ESXi, Oracle VM Server for x86 are some examples for Type 1 Hypervisors while VMware Workstation, VMware Player, VirtualBox, Parallel Desktop for Mac are some examples for Type 2 Hypervisors.
In conclusion, Hypervisor is capable of creating and executing virtual machines. There are two types of hypervisors as Type 1 and Type 2. The main difference between Type 1 and Type 2 Hypervisor is that Type 1 Hypervisor runs directly on the host’s hardware while Type 2 Hypervisor runs on an operating system similar to other computer programs.
1.“Hypervisor.” Wikipedia, Wikimedia Foundation, 11 Apr. 2019, Available here.
2.edureka! VMware Tutorial For Beginners | VMware Workstation | VMware Virtualization | Edureka, Edureka!, 25 June 2018, Available here.
Agenda: Kubernetes Setup Using Kubeadm In AWS EC2 Ubuntu Servers
=======================================================
Prerequisite:
==========
3 - Ubuntu Serves
1 - Manager (4GB RAM , 2 Core) t2.medium
AMI : EC2 Ubuntu t2.medium (Name:Kubernetes_master_node)
Security Group:
2 - Workers (1 GB, 1 Core) t2.micro
AMI : EC2 Ubuntu t2.micro (Name:Kubernetes_worker_One and Kubernetes_worker_Two)
Security Group:
Note: Open Required Ports In AWS Security Groups. For now we will open All trafic.
==========COMMON FOR MASTER & SLAVES START ====
# First, login as ‘root’ user because the following set of commands need to be executed with ‘sudo’ permissions.
sudo su -
# Install Required packages and apt keys.
apt-get update -y
apt-get install -y apt-transport-https
curl -s https://packages.cloud.google.com/apt/doc/apt-key.gpg | apt-key add -
cat <<EOF >/etc/apt/sources.list.d/kubernetes.list
deb https://apt.kubernetes.io/ kubernetes-xenial main
EOF
apt-get update -y
#Turn Off Swap Space
swapoff -a
sed -i '/ swap / s/^\(.*\)$/#\1/g' /etc/fstab
# Install And Enable Docker
apt install docker.io -y
usermod -aG docker ubuntu
systemctl restart docker
systemctl enable docker.service
#Install kubeadm, Kubelet And Kubectl
apt-get install -y kubelet kubeadm kubectl kubernetes-cni
# Enable and start kubelet service
systemctl daemon-reload
systemctl start kubelet
systemctl enable kubelet.service
==========COMMON FOR MASTER & SLAVES END=====
===========In Master Node Start====================
# Steps Only For Kubernetes Master
# Switch to the root user.
sudo su -
Configuring the kubelet cgroup driver.
kubeadm allows you to pass a KubeletConfiguration structure during kubeadm init. This KubeletConfiguration can include the cgroupDriver field which controls the cgroup driver of the kubelet.
cat << EOF >> /etc/docker/daemon.json
{
"exec-opts": ["native.cgroupdriver=systemd"]
}
EOF
Restart your docker service:
# systemctl restart docker
Reset kubeadm initializations:
# kubeadm reset
# Initialize Kubernates master by executing below commond.
kubeadm init
#exit root user & exeucte as normal user
exit
mkdir -p $HOME/.kube
sudo cp -i /etc/kubernetes/admin.conf $HOME/.kube/config
sudo chown $(id -u):$(id -g) $HOME/.kube/config
# To verify, if kubectl is working or not, run the following command.
kubectl get pods -o wide --all-namespaces
#You will notice from the previous command, that all the pods are
running except one: ‘kube-dns’. For resolving this we will install a #
pod network. To install the weave pod network, run the following
command:
kubectl apply -f "https://cloud.weave.works/k8s/net?k8s-version=$(kubectl version | base64 | tr -d '\n')"
kubectl get nodes
kubectl get pods --all-namespaces
# Get token
kubeadm token create --print-join-command
=========In Master Node End====================
Add Worker Machines to Kubernates Master
=========================================
Copy kubeadm join token from and execute in Worker Nodes to join to cluster
kubectl commonds has to be executed in master machine.
Check Nodes
=============
kubectl get nodes
Deploy Sample Application
==========================
kubectl run nginx-demo --image=nginx --port=80
kubectl expose deployment nginx-demo --port=80 --type=NodePort
Get Node Port details
=====================
kubectl get services